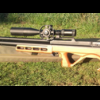
AR177 588 Posted June 22, 2013 Report Share Posted June 22, 2013 (edited) Hello all I have been meaning to do this for a while now and I have finally gotten around to it... As many of you know my original air rifle is a Daystate Air Ranger in 177 It is a brilliant gun and I love to shoot - with some degree of success It really is a beautiful rifle and I still think the Air Ranger/Wolf stocks are the best looking factory ones you can get (you can have your own opinions that one is mine) so what did i do to this beautiful rifle? ..... ... covered it in camo dip which i was happy with for a while.... until the novelty wore off and the realization of what a terrible crime I had commited I now plan to right those wrongs! Im going to remove all the camo from the stock, bottle and shroud Re-blue / spray the shroud Re-blue / spray the bottle back to black Re-finish the stock back to its original beauty so here is the monster I started by fully stripping down the gun, barrel band off, shroud off, stock off of the action, butt pad off, sling and swivel studs out I then proceeded to release the air from the bottle - now you can do this two ways 1. keep firing off the action until all the air runs out ( from a 200bar charge thats about 160ish shots) 2. release the pressure through the gauge Using a 22mm spanner simply unscrew the gauge until you can hear the air release ** DO NOT FULLY UNSCREW THE GAUGE WHILE THERE IS STILL PRESSURE INSIDE THE BOTTLE ** as it will shoot off like a bullet liable to damage something if you do that once the hissing air has stopped its safe to fully unscrew the gauge and then it is possible to undo the air bottle out came the trust Nito-mors which is brilliant stuff I suggest (as does the bottle) its use outdoors unless you like the smell of chemicals and feeling light headed And it soon might light work of that awful mess i had put onto the stock ! I also used some 0000 wire wool just to help with lifting the camo The stock has come up really well so far, im probably going to have to give a second coat of nitro just to clean up the last little bits, ill also be using an old toothbrush (failing that the wifes') to get into the grips and Daystate decals to remove the final bits of coating This is nothing against the guys that dipped the rifle as they did a superb job All camo removed, stock looking decent and left drying ready to stain and oil..... came to stain the stock and got out my trusty Birchwood-Casey stock finishing set with the walnut stain... and the stain was empty .. looks like I had finished it off when i did the s10 stock .. but.. adding a bit of water into the bottle managed to get me just enough diluted stain to give a very light stain, which overall was the exact amount I needed I emphasized the grip checkering with black pen which i think gives it a really classy look .. i also filled in the daystate decals and sanded off the excess to highlight them Have a butchers yourselves After letting everything dry the stock was ready for tru oil I havent got crazy with the oil I like the matte look so 5 coats later and for me, the stock is finished So 1 part down now onto the shroud and bottle .... I started with the shroud, removing the two small retaining grub screw and taping up the threads as I didnt want to damage them or get them full of crap Out came the nitro-mors and the 0000 wire wool and as I didnt know how this was going to react I was a little nervous as I set about it And to both my amazement and delight........ Nitro didnt affect the shroud anodizing! So all that was required was to touch up the knurled end that the wire wool had shined up slightly, i used hammeright black spray paint, satin finish (only one I could find that wasnt gloss in the local DIY shop) It matches the shroud colour and shine perfectly Dog came out to watch too.. so no pressure So the shroud is done and looks like it came straight from the factory now onto the bottle... Same approach as i was under the impression they were coated the same... WRONG! The bottle seems to have been sprayed so the Nitro began to strip off the black coating.. I managed to get the camo off without too much damage to the bottle and quickly washed off the excess to prevent any further damage. I made sure I kept the bottle opening down to limit any water ingress into the bottle as any water or dampness in there will effect the working of the rifle So after drying, i sanded down the bottle to remove any flakes of paint, de-greased the bottle and secured the bottle ready for a spray the finish is alot smoother than it looks there Its coming along nicely and everything is being left to dry at the minute.. Ok so.. I tried spraying, I tried spraying over primer, I tried spraying over primer and bakes in the oven inbetween ............ all attemps failed .. good job I had a large bottle of nitro-mors I had concluded that the spray I bought wasn't up to the job So after a suggestion from Darryl i went out and got myself some plastikote spray ... now thats the dogs danglies! So .. back to square one.. Nitro - Sandpaper- Elbow grease Next the metal primer... I then baked it in the oven for 30mins and left to cool to speed up the process (had to make up for lost time) I repeated this process until I had a nice even coat of metal primer I then sprayed several layers of plastikote and baked each of those too VICTORY! The plastikote is far superior for this purpose compared to the hammerite spray so .. the only thing left to do is build her back up... Here she is it was all worth it in the end ......now what am i going to do for a project ?.... Thanks for reading ATB Adam Edited June 22, 2013 by AR177 6 Quote Link to post
wedge2409 98 Posted June 22, 2013 Report Share Posted June 22, 2013 Well done once again Adam,you're a very modest person,i've seen you shoot that rifle and it would take someone on top form to compete against you.As for the rifle you started something many wouldn't attempt,at the end of the day you could have knackered your £1000 rifle,but instead you've restored it to its former glory.Spot on mate.Hope it still shoots as well as it did,no air leaks.ATB..Ste 1 Quote Link to post
the big chief 3,099 Posted June 22, 2013 Report Share Posted June 22, 2013 thats much better verry good write up enjoyed it 2 Quote Link to post
AR177 588 Posted June 22, 2013 Author Report Share Posted June 22, 2013 Well done once again Adam,you're a very modest person,i've seen you shoot that rifle and it would take someone on top form to compete against you.As for the rifle you started something many wouldn't attempt,at the end of the day you could have knackered your £1000 rifle,but instead you've restored it to its former glory.Spot on mate.Hope it still shoots as well as it did,no air leaks.ATB..Ste You give me too much credit Ste mate Re-posted for moxy for the complete story 1 Quote Link to post
thursodog 353 Posted June 23, 2013 Report Share Posted June 23, 2013 Thats an amazing transformation, really enjoyed this. Cheers Chris. 2 Quote Link to post
pianoman 3,586 Posted June 23, 2013 Report Share Posted June 23, 2013 It's truly a lovely job you've done Adam. Well done indeed mate. And it's been good to follow your progress Best wishes for continued great shooting with it Adam. Simon 1 Quote Link to post
AR177 588 Posted June 23, 2013 Author Report Share Posted June 23, 2013 It's truly a lovely job you've done Adam. Well done indeed mate. And it's been good to follow your progress Best wishes for continued great shooting with it Adam. Simon Many thanks Simon, She is looking all pritty but she will be sat in the cabinet for a rest The 97K is my new go to gun now 1 Quote Link to post
mick1212 389 Posted June 23, 2013 Report Share Posted June 23, 2013 You've done a cracking job did I hear you need a new project got a mk2 rapid been ruined I mean dipped lol 1 Quote Link to post
AR177 588 Posted June 23, 2013 Author Report Share Posted June 23, 2013 You've done a cracking job did I hear you need a new project got a mk2 rapid been ruined I mean dipped lol Well if you want to part with it for the right price Quote Link to post
mick1212 389 Posted June 23, 2013 Report Share Posted June 23, 2013 You've done a cracking job did I hear you need a new project got a mk2 rapid been ruined I mean dipped lol Well if you want to part with it for the right price why do you think I bought it not for its looks lol 1 Quote Link to post
leeroy 29 Posted June 24, 2013 Report Share Posted June 24, 2013 You made a cracking job of that theres a lot of time gone into that , it does look a lot better now back in wood , well done. 1 Quote Link to post
AR177 588 Posted June 24, 2013 Author Report Share Posted June 24, 2013 You made a cracking job of that theres a lot of time gone into that , it does look a lot better now back in wood , well done. cheers mate Quote Link to post
mikemorton 2 Posted July 6, 2013 Report Share Posted July 6, 2013 It looks really good! I think we've all done things that seemed like a good idea at the time - only to regret it. I think it looks fantastic now - and can appreciate the work involved. 1 Quote Link to post
gurtwurz 792 Posted July 7, 2013 Report Share Posted July 7, 2013 The wood grain on that stock has come up lovely adam, thats a real proper job you've made there mate. No doubt its shooting to its usual extremely high standard now too? Quote Link to post
AR177 588 Posted July 7, 2013 Author Report Share Posted July 7, 2013 (edited) The wood grain on that stock has come up lovely adam, thats a real proper job you've made there mate. No doubt its shooting to its usual extremely high standard now too? It shoots alright for me wurz mate yes im very happy with how everything has gone, no silencer either for it im just going shrouded. still very quiet I still have an adjustable butt to put on it but i havent got round to it, did one for the 97k then didnt get round to this one..... yet Edited July 7, 2013 by AR177 Quote Link to post

Recommended Posts
Join the conversation
You can post now and register later. If you have an account, sign in now to post with your account.
Note: Your post will require moderator approval before it will be visible.