Always use quality brass wire, do not use inferior brass wire as used in picture frame wire as its too springy, snaps easy and is no use whatsoever to the experienced trapper.

The illustration shown here should inform the snareman that his snare was set too low, this is what you find happens with low set snares when snaring with small silly loops, the rabbit has struck the underside of the top of the noose with his muzzle causing the snare to catch it around the nose, the rabbit then rolls and springs around and flings the snare from its face, hence the small tiny kinked loop approx the size of a 2 penny piece. I have shown many rabbit snarers what was the cause of their problems as many of them become so frustrated by the sheer numbers of sprung and tripped snares that they were getting each morning, genuine lads who were trying their best but getting nowhere fast. The problem stems from the amount of books and articles written over the years where practically every scribe copies each other about setting small loops, between the beats and four fingers high nonsense, another piece of nonsense thats written is about setting extra snares to compensate for the misses you get, anyone who makes statements like this tells me straight away that they really no nothing about snaring, in my opinion they are incompetent snarers.
The reason I have drawn these articles and penned this information is to weed out the imposter and the so called snaring expert, remember it was experts who built the titanic, if you set the snare the way I do you will have very few misses, over the years I’ve caught 97 out of a 100 (3 times) and over 190 out of 200 in the morning. I do not disturb the rabbits at night with a silly torch and I set no extras to compensate for misses. There are lads that I have taught over the years who can snare over 10,000 rabbits a season. Therefore I must of done something right.
The double knot you see under the double eye of the tealer is as simple a swivel as you can get. Your snares will last a hell of a lot longer using this method, than if they are permanently attached to the tealer, a number of years ago I snared 1500 rabbits doing a little test while just working at times with 100-150 pegged snares, and I only had to replace 4 nooses, on saying that I had no problems with foxes. So remember if you get small kinked nooses as shown in the illustration, set you snares up higher..
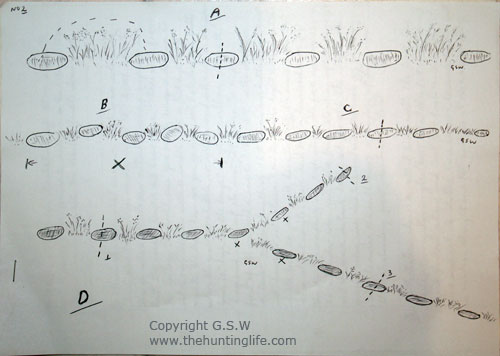
Here you will see an illustration of three separate rabbit runs, I will proceed to explain how to set them properly and eliminate the visible faults drawn in the picture.
A – Illustrates a rabbit run in high grass where the beats can be at times roughly 14″ to 18″ – 2 feet apart this is where all the so called snaring experts are lost, the small loop & set low men. This will prove I’m telling the truth, can you really imagine trying to set a run like this with a small loop a fist high and more to the point how are you going to set between the beats when the grass or stubble, or weeds and setaside is anywhere from 10″ high to the height of your wellies, get real boys and wake up its not going to happen.
First of all you need a snare loop 7.5″ x 5.5″ attached to a tealer minimum length of 10 1/2″ long and the snare loop will have to sit between 9 and 10 inches in height to the bottom of the loop, so you will have to cock the snare noose up at a slight angle, make and keep a couple of hundred snares for this kind of snaring in high stuff. Its pure common sense to set higher when you can have fauna standing up to welly height and the more distant beats, ask yourself this why is the grass growing nice and tall and only the beats are showing, thats because the rabbits are springing up higher and over the high standing grass from beat to beat.
B – Illustration shows a rabbit run with the first five beats irregular angles (don’t set at this point of the run) move further along and look for beats in a straight line and set as dotted line shows, because the rabbit is running straight and hits each beat more accurately
C – In this illustration you will see a forked run set where the three dotted lines occur at 1, 2 & 3 (Do not set) where you see the beats marked with an X, the reason being all these beats lie at an angle either when the rabbit is going out or coming back in so leave them alone.
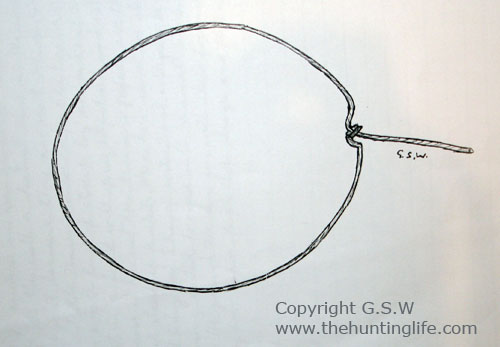
The illustration of this snare loop shows how a lot of amateur and even gamekeepers still set a snare loop like this with a distinct kink in the wire above the eyelet because they do not know how to set the tension into a rabbit snare properly. This small loop if struck by an animal or bird out in a field will spring half closed and catch nothing, because it has not been tensioned properly so that it will reset itself if knocked. This is how snares are still being set today and I know of instructors at colleges who are still showing students to snare with a small noose set low to the ground, the same goes with their fox snares, will they ever learn. People hate changes and pride is a great thing.
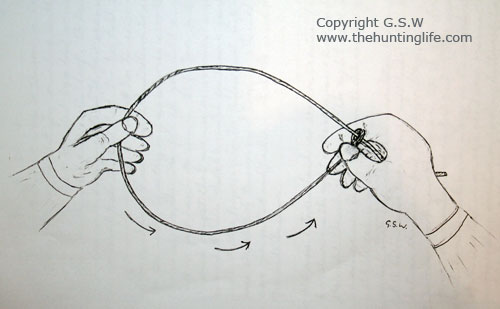
This is one of the few different ways to tension a rabbit snare loop properly so that your snare loop will spring back into position if brushed by a bird or reset itself if knocked from underneath the loop. To be shown by a man with experience takes a few seconds to accomplish this simple feat, but only to be told takes longer which is most obvious, so to save any confusion I have drawn an illustration to accompany the wording, as they say a picture is worth a thousand words. Therefore if you hold a snare loop in your hands as seen in the picture, first of all I would suggest that you use an amateur size noose around 4 inches diameter until you become familiar with it then progress onto the professional size noose once the skill of tensioning a large noose is attained the more you just sit and practice with it the more proficient you will become.
1.Hold noose between hands as shown, in actual fact I have shown you the eyelet on the open snare loop, in fact the right thumb should cover the eyelet as it be compressed firmly between thumb and fore finger until the job is done.
2.Squeeze or compress the snare loop slightly inwards in a concertina fashion, still holding snare loop open with right hand at all times between thumb and first joint of forefinger.
3.You now work your thumb and tips of your four fingers down and around the loop pushing slack and squeezing straight with thumb which moves always on the underside of the wire loop in an anti clockwise manner as arrows show direction right along bottom of loop until your left thumb & fingers have reached to your right hand.
4.Release eyelet with your right hand and just hold snarewire with same hand
5.Take forefinger on left hand and push snarewire upwards just under eyelet, now pull left forefinger back and the eyelet should now spring backwards towards your right hand or back onto top of tealer eye if using a pegged snare.
6.Just repeat the process until you get the hang of it by squeezing or compressing loop and work in an anti clockwise fashion down around the bottom of the snare loop.
7.Once you get the hang of it and tension set, you then start and shape a nice big oval snare loop similar to what you see in the illustration.
8.People who are left handed hold the snare loop in left hand and work round the loop in a clockwise fashion.
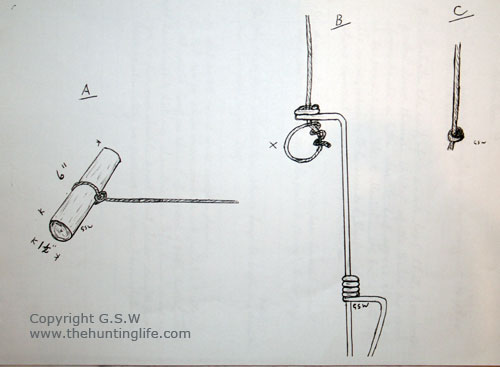
A – Shows a six inch length of dowling or hazel or ash, etc 1 1/2″ diameter.
B – Illustrates the end of a snare loop that has been pushed down through the top of the tealer eye and formed into a little double loop approx the size of a ten pence piece, the X illustrates the belly side of the noose, which is to be avoided therefore illustration shows correct procedure to pull into knot.
C – A nice double knot has now been formed to act as a swivel as it can’t be pulled through tealer eye.
D – This three part illustration shows how to make a perfect double knot in your snare loop.
- Slip snare noose over wooden dowling
- Let tealer slide down snare wire until it stops at small loop in the end of snare & pull tealer firmly with right hand while holding dowling in left hand and now you have a nice double snare knot its so simple & easy there is absolutely no pressure on your hands whatsoever.
Well I would like to thank Ian for asking me to do this snaring sequence for hunting life to dispel all the misinformation and lies thats been written about rabbit snaring over the years which I’am sure has frustrated many beginners and young kids who have been out trying their best, and become frustrated listening to these writers, who’s get out clause is keep practising as you must not be doing it right. In my opinon imposters should be jailed for impersonating a real trapper. I hope that the truth I have written on rabbit snaring from many many years of practical experience will help many young kids who set their snares, to know that they will catch rabbits in a morning, not just hope they might catch them. The knowledge I have imparted with is a very small fraction of whats known about snaring, but thats all you are getting, as I’m going to get my book finished, so all the viewers take care and all the best.


