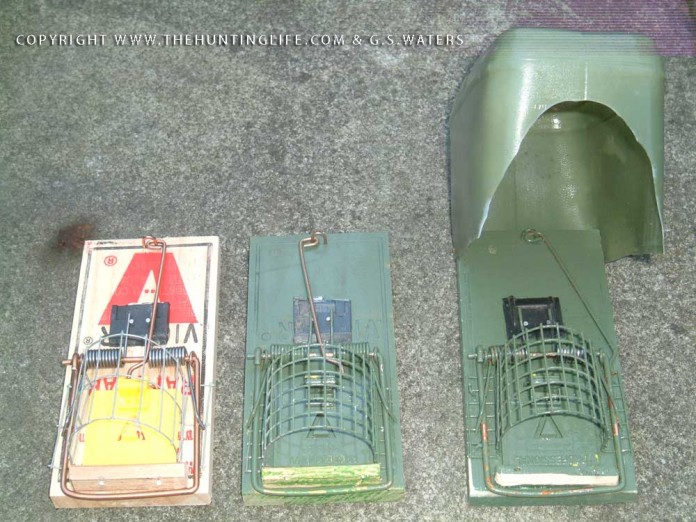
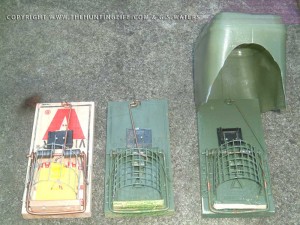
The victor pro rat trap is about the best breakback trap on the market, the cedar base is strong and robust, it measures 7 inches long by aproximately 3 ½ inches broad and just over ½ inch thick. The trap pan consists of a strong pliable yellow plastic, 2 inches square and about 1/6 th inch thick with a raised housing at the top of the pan, in front of the springs, the trigger rod engages into the back of the housing when the trap is set, there are two settings light and heavy. The square shaped striker or kill bar is approximately 3 ½ inches long by 3 inches wide outside to outside around 3 ½ mm diameter strong and robust, held securely by two strong staples that sit on the outside edge of the two ¾ inch long steel springs 3/8 th inch in diameter which are also strong and robust with eleven coils in each spring, with two prongs protruding from the back, one from each spring this allows leverage when springs cocked and trip is ready to fire. The two forward arms that protrude from the front of the spring ends lay at an angle over the sides of the kill bar to propel it forward once the trap is sprung. The steel trigger rod is 4 ½ inch long and a couple of mm diameter, this holds the kill bar down when the trap is in the set position.
Trap Information
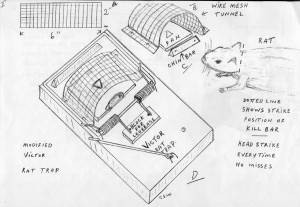
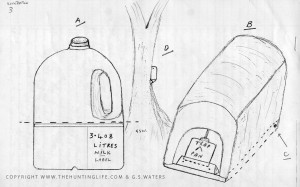
- A. Cut a 6 inch long x 2 inch wide ¼ inch mesh strip of this fine gauge mesh used for making bird feeders to hold nuts, you can normally purchase it at garden centres and other diy stores. Bend the wire mesh into a half tunnel shape as shown in the illustration “A” the front of the little mesh cage should sit a little bit back from the front edge of the trap pan to allow clearance for the kill bar as it comes over the top and front of the little wire cage, take forefinger and thumb and give back of wire tunnel cage a slight squeeze inwards, this makes sure that the forward spring arms clear on firing.
- B. I get the proper shape of the wire tunnel bending it around an empty 2 inch diameter cod liver oil tub.
- C. The chin bars are cut from seasoned hard wood oak, ash, etc 2 ½ inch long, 3/8 inch broad and a ½ inch high. Drill two tiny pilot holes one near each end and attach permanently with two panel pins, look at illustration “2 -No F” Wire chin bar made from 3 or 4 mm galvanised fence wire.
- D. Position the chin bar in front of trap pan, between it and the kill bar, this allows clearance for the pan to move freely up and down, also clearance when the kill bar comes over the top on its downward strike.
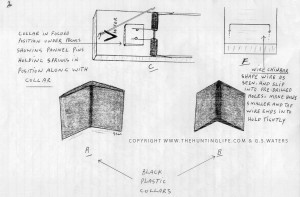
- E. To increase the killing power of the trap, prize up the two prongs at the back of the springs and slip an inch square block of hardwood 3/16 inch thick or a plastic collar folded over and slipped under prongs, this little trick increases the leverage and killing power of the trap immensley. These plastic collars are right angled shape and over all length 2 ½ inch x 1 ¼ inches broad, they can be found lying around wood yards and builders supply depots, they are plastic, black in colour, waterproof, weatherproof and overall very good. After one of these folded collars have been inserted under the double prongs at the back of the springs you now slide each spring along the back of the kill bar outwards towards the edge of the trap then hammer a panel pin down through plastic collar to hold it and each prong in a straight line as shown on trap, this stops the prongs sliding inwards into a V shape, and keeps the springs sitting in position so that they cannot slip inwards , therefore you get the maximum even leverage, giving you far more striking power to kill the target animal quickly. Once the animals head enters under the cage tunnel the trap which has now been modified fires so fast with greater striking power that you get a head strike every time and no misses although the trap is designed for rats it wipes out stoats, weasels, grey squirrels and even mice that enter into the tunnel, once the animals head enters over the chin bar and under the wire cage tunnel and touches the pan its dead in an instant as the kill bar strikes at the back of the head and the chin bar forces the head back they can’t move and expire in seconds, by inserting the trap in a flat position in a vice, then hooking a spring scale balance under the kill bar and pulling it back over into a setting position the reading I got was approx 12lbs of power, but I might be wrong, it was just a spur f the moment experiment.
