undisputed 1,664 Posted November 13, 2009 Report Share Posted November 13, 2009 Is there any specific settings on my camera I should use when trying to capture the colours properly? Quote Link to post Share on other sites
undisputed 1,664 Posted November 13, 2009 Author Report Share Posted November 13, 2009 (edited) Is there any specific settings on my camera I should use when trying to capture the colours properly? Edited November 13, 2009 by undisputed Quote Link to post Share on other sites
mattydski 560 Posted November 13, 2009 Report Share Posted November 13, 2009 you could try using a 0.5 neutral density gradient filter, in a Cokin square filter holder. That will darken the sky slightly and allow you to have a slightly longer exposure, balancing the exposure range. You can also get gradient filters in blue and orange to make the scene appear cooler or warmer. If it is just an exposure problem, try bracketing the exposure +/- 1, 0.5, 1.5 and 2 stops. This will give you a range of exposures. Quote Link to post Share on other sites
undisputed 1,664 Posted November 13, 2009 Author Report Share Posted November 13, 2009 you could try using a 0.5 neutral density gradient filter, in a Cokin square filter holder. That will darken the sky slightly and allow you to have a slightly longer exposure, balancing the exposure range. You can also get gradient filters in blue and orange to make the scene appear cooler or warmer. If it is just an exposure problem, try bracketing the exposure +/- 1, 0.5, 1.5 and 2 stops. This will give you a range of exposures. LOL cheers mate could I have that in English now Quote Link to post Share on other sites
mattydski 560 Posted November 13, 2009 Report Share Posted November 13, 2009 see if you have an exposure compensation setting. Is it a compact camera, or slr? Quote Link to post Share on other sites
undisputed 1,664 Posted November 13, 2009 Author Report Share Posted November 13, 2009 (edited) see if you have an exposure compensation setting. Is it a compact camera, or slr? Nikon D5000 digi cam Edited November 13, 2009 by undisputed Quote Link to post Share on other sites
mattydski 560 Posted November 13, 2009 Report Share Posted November 13, 2009 the following are settings that can be varied in you camera... I would try Autumn colour mode, or night landscape mode. See if that gives you the desired effect. If not try exposure bracketing in landscape mode. +/- 1 stop. It will be automatic. Taken off the web!! Exposure modesAuto modes (auto, auto [flash off]), Advanced Scene Modes (Portrait, Landscape, Child, Sports, Close up, Night portrait, Night landscape, Party/indoor, Beach/snow, Sunset, Dusk/dawn, Pet portrait, Candlelight, Blossom, Autumn colors, Food, Silhouette, High key, and Low key), programmed auto with flexible program (P), shutter-priority auto (S), aperture-priority auto (A), manual (M)Exposure compensation±5 EV in increments of 1/3 or 1/2 EV Exposure bracketing3 frames in steps of 1/3 or 1/2 EV Quote Link to post Share on other sites
undisputed 1,664 Posted November 13, 2009 Author Report Share Posted November 13, 2009 the following are settings that can be varied in you camera... I would try Autumn colour mode, or night landscape mode. See if that gives you the desired effect. If not try exposure bracketing in landscape mode. +/- 1 stop. It will be automatic. Taken off the web!! Exposure modesAuto modes (auto, auto [flash off]), Advanced Scene Modes (Portrait, Landscape, Child, Sports, Close up, Night portrait, Night landscape, Party/indoor, Beach/snow, Sunset, Dusk/dawn, Pet portrait, Candlelight, Blossom, Autumn colors, Food, Silhouette, High key, and Low key), programmed auto with flexible program (P), shutter-priority auto (S), aperture-priority auto (A), manual (M)Exposure compensation±5 EV in increments of 1/3 or 1/2 EV Exposure bracketing3 frames in steps of 1/3 or 1/2 EV Cheers man! Quote Link to post Share on other sites
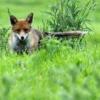
Fabapocalypse 35 Posted November 14, 2009 Report Share Posted November 14, 2009 You can also, with the sort of camera that takes the light reading and focus lock when you press the shutter half-way down, "fool" the camera, or at least experiment to see how best to catch the light. Frame your shot by pointing your camera at the middle of the scene you want to photograph, take your shot. Then point it at the lightest part of the scene, press and hold the shutter half-way, then swing the camera back to the scene, frame and take the shot. Then do the same again, pointing the camera at the darkest part of the scene, press and hold the shutter release button half-way, then swing back, frame and take your shot again. You'll end up with three shots (or however many times you do it!) giving various exposures and one will usually make the best of the colours in your shot, often without having to do any editing afterwards. If you're working hand-held you need to be very smooth and keep the camera as still as possible when firing the shutter. 4.00 a.m. 6.00 a.m. 7.00 p.m. (This one's a bit grainy as the camera was in "sport mode" when I took it) 9.00 p.m. You can use the same method to make colours "pop" in full light, or to de-flatten black and white shots. Quote Link to post Share on other sites
Prince_Jimmy 0 Posted November 14, 2009 Report Share Posted November 14, 2009 You can also, with the sort of camera that takes the light reading and focus lock when you press the shutter half-way down, "fool" the camera, or at least experiment to see how best to catch the light. Frame your shot by pointing your camera at the middle of the scene you want to photograph, take your shot. Then point it at the lightest part of the scene, press and hold the shutter half-way, then swing the camera back to the scene, frame and take the shot. Then do the same again, pointing the camera at the darkest part of the scene, press and hold the shutter release button half-way, then swing back, frame and take your shot again. You'll end up with three shots (or however many times you do it!) giving various exposures and one will usually make the best of the colours in your shot, often without having to do any editing afterwards. If you're working hand-held you need to be very smooth and keep the camera as still as possible when firing the shutter. 4.00 a.m. 6.00 a.m. 7.00 p.m. (This one's a bit grainy as the camera was in "sport mode" when I took it) 9.00 p.m. You can use the same method to make colours "pop" in full light, or to de-flatten black and white shots. Great pics Quote Link to post Share on other sites

Recommended Posts
Join the conversation
You can post now and register later. If you have an account, sign in now to post with your account.
Note: Your post will require moderator approval before it will be visible.